
The content on this site may include affiliate links. As an Amazon Associate I earn from qualifying purchases. This means that, at zero cost to you, we will earn an affiliate commission if you click on one of the links and buy something.
New to baking? 🍪 These 20 beginner-friendly tips will help you avoid common mistakes and bake with confidence! From measuring flour the right way to using your oven like a pro, this guide is packed with helpful advice for anyone learning to bake. #bakingtips #beginnerbaker #homebaking #bakingforbeginners #cookietips #bakinghacks #whiskbakesmile
There’s something magical about baking from scratch — the smell of cookies in the oven, the satisfaction of frosting a cake that didn’t collapse, the moment your kids take a bite and say “You made this?!” (followed by crumbs all over your floor, obviously).
But let’s be honest: when you’re just starting out, baking can feel a bit… overwhelming. Do I sift the flour? Why is my butter melting? What even is the difference between baking soda and baking powder and why are they both in the recipe?
If you’ve ever found yourself googling “what went wrong with my banana bread” at 10pm, you are so not alone. And that’s why I put together this handy little list — 20 simple tips every beginner baker should know. These are the things I wish someone had told me when I was elbow-deep in sticky dough wondering if my cookies were supposed to look like pancakes.
So whether you’re baking your first batch of muffins or finally tackling that layer cake you saved on Pinterest three months ago, these tips will help you feel a little more confident (and a lot less stressed) in the kitchen.
Let’s get baking — flour smudges and all. 💕
Tip 1. Read the Recipe All the Way Through First
I know, I know — it sounds obvious. But in the excitement of baking, it’s so easy to skim the ingredients, preheat the oven, and jump right in… only to realize halfway through that your dough needs to chill for 4 hours, or your eggs should’ve been room temperature, or you were supposed to cream the butter, not melt it.
Reading the recipe from start to finish before you touch a single spoon is like checking the map before you start a road trip. It helps you:
- Know what steps are coming (no surprise chill times!)
- Double-check that you actually have all the ingredients
- Avoid panicked mid-bake Googling like “what is folding and do I need a degree in origami to do it?”
So give the recipe a quick read — and maybe a second glance — before you start measuring anything. Future you (the one not scraping sticky batter out of your hair at midnight) will thank you.
Tip 2. Follow the Recipe Exactly the First Time
Baking is not the time to get wild with substitutions — at least not when you’re just starting out. I get the urge to swap the butter for coconut oil, reduce the sugar “just a little,” or toss in some bonus chocolate chips (okay, that one’s forgivable). But when you’re making a recipe for the first time, sticking to the instructions is your best bet for success.
Why it matters:
Baking is a science. That balance of wet to dry, fat to flour, sugar to salt? It’s all there for a reason. One little tweak might be the difference between soft and chewy… or dry and sad.
What to do instead:
Make the recipe exactly as written once. Then, if you want to experiment next time (less sugar, gluten-free flour, unicorn sprinkles), go for it — at least you’ll know what the original is supposed to taste like.
Because nothing’s worse than a baking flop and not knowing what went wrong.
Tip 3. Baking Is a Science (and Your Measuring Cup Is Your BFF)
Unlike cooking — where you can toss in a little of this, a splash of that, and still end up with something edible — baking is a whole different ballgame. It’s basically edible chemistry, and every measurement, temperature, and step matters more than you’d think.
Here’s why:
- Too much flour? You get dry, dense muffins.
- Not enough leavening? Your cake won’t rise.
- Forgot to soften your butter? Good luck creaming it.
Every little step in a baking recipe is there for a reason — not just to be bossy. So think of your recipe as a gentle guide from someone who’s already tested this thing twenty times (possibly while wearing stretchy pants and stress-eating cookie dough).
Bottom line:
Baking is science. Which means if you follow the formula, you’re way more likely to get that sweet, golden, “I baked this from scratch and it actually worked!” kind of win.
Tip 4. Measure Flour the Right Way (Because It’s Probably Why Your Cookies Are Dry)
Flour seems innocent enough — you scoop, you dump, you mix… right? But here’s the thing: how you measure flour can make or break your bake. Literally. Too much flour is the #1 reason cookies turn out dry, cakes are dense, and muffins become sad little bricks.
Here’s what not to do:
Don’t dip your measuring cup straight into the flour bag like it’s a spoon. That packs the flour down, and you’ll accidentally end up using way more than the recipe actually intended.
Here’s what to do instead:
- Fluff the flour in the bag or container with a spoon.
- Spoon it into your measuring cup gently — don’t shake or tap it down.
- Level it off with a knife or the back of the spoon. No heaping. No packing.
Bonus points if…
You have a kitchen scale and go by grams — but if not, the spoon-and-level method is the next best thing.
Trust me, this tiny change makes a huge difference. Your cookies will be softer, your cakes fluffier, and your bake sale reputation? Glorious.
➡️ This way for more Cookie Baking Tips
Tip 5. Use Room Temperature Ingredients (Your Cookies Will Thank You)
So you’re halfway into your recipe, eggs straight from the fridge in one hand, butter that’s still basically a brick in the other — sound familiar? We’ve all been there. But using cold ingredients when the recipe calls for room temp can seriously mess with your bake.
Here’s why it matters:
Room temperature butter creams better with sugar, room temp eggs mix more evenly into batter, and everything blends together like a happy baking family. Cold ingredients = clumpy batter, wonky texture, and sometimes cakes that don’t rise properly.
How to fix it fast:
- Forgot to soften your butter? Cube it up and let it sit on the counter for 15 minutes, or microwave it in 5-second bursts on low power. (Do not melt it. You want soft, not soupy.)
- Need room temp eggs in a hurry? Pop them (in their shells!) in a bowl of warm water for 5–10 minutes.
The bottom line:
Unless your recipe specifically calls for cold or melted ingredients, room temp is where it’s at. It’s one of those little things that makes a big difference — and takes your bake from “pretty good” to “holy wow, did you make this?!”
Tip 6. Use Unsalted Butter (So You Can Be the Boss of the Salt)
If your recipe says “unsalted butter” and you reach for the salted stuff because that’s what’s in the fridge… pause for just a second.
Here’s the deal:
Salted butter has — surprise! — salt in it. And the problem is, every brand adds a different amount. So when you bake with it, you’re basically guessing how salty your cookies or cakes will be.
Why unsalted butter is better:
- You get total control over how much salt is in the recipe.
- It’s fresher. Salt is a preservative, so unsalted butter usually has a shorter shelf life — meaning it hasn’t been hanging out in a warehouse since last Christmas.
- Most recipes (especially American ones) are tested with unsalted butter, so using it gets you the intended result.
In a pinch:
If you do use salted butter, just reduce any added salt in the recipe by half. It’s not the end of the world — but if you’re new to baking, sticking with unsalted gives you the most predictable (and delicious) results.
Tip 7. Check Your Baking Powder and Baking Soda — They Expire!
You know those dusty little tins in the back of your cupboard? The ones you use, like, twice a year? Yeah… they have a shelf life. And if they’re past it, your cookies, muffins, and cakes might not rise. At all. We’re talking flat-as-a-pancake sad.
Here’s the thing:
Baking soda and baking powder are both leavening agents, which means they help your baked goods puff up and get that lovely rise. But over time, they lose their oomph — and if you’re using the same can from three Thanksgivings ago, your banana bread may never bounce back.
How to check if they’re still good:
- For baking soda: Mix a spoonful with vinegar. It should fizz up like a science project.
- For baking powder: Mix a spoonful with hot water. You should see bubbles. No fizz = time to toss.
Pro tip:
Write the open date on the lid when you buy them. Replace every 6 months or so to be safe — they’re cheap, and totally worth the fresh start.
Tip 8. Fresh Ingredients Make a Big Difference (Even the Ones That Don’t Seem Exciting)
When you think of “fresh ingredients,” your mind probably goes to eggs, butter, maybe milk. But here’s a little secret: even the shelf-stable things — like flour, baking spices, and cocoa powder — go stale, and it shows up in your final bake more than you’d think.
What happens when ingredients are old?
- Flour can develop a weird taste or lose its structure.
- Cinnamon, nutmeg, and other spices lose their flavor punch.
- Cocoa powder can taste flat instead of rich and chocolatey.
- Even nuts can go rancid if stored too long!
What to do instead:
Give your ingredients a quick sniff test. If it doesn’t smell like anything, it probably won’t taste like much either. Replace anything that’s been open longer than a year (and spices even sooner if you’re fancy like that).
Extra tip:
Store flour, nuts, and even yeast in the freezer to keep them fresher longer. Bonus: it frees up pantry space for more sprinkles. 😄
Tip 9. Crack Eggs Into a Separate Bowl First
You’re in the baking zone. The batter’s almost ready. You crack an egg right into the bowl — and whoops, a piece of shell falls in. Or worse… the egg is bad. Or double worse… it’s your last egg.
Cue the panic.
Here’s how to avoid all that drama:
Always crack your eggs into a small bowl first — then add them to your mixing bowl one at a time. That way:
- If you get a bit of shell, you can fish it out easily (a wet finger or half an eggshell works like a charm).
- If an egg is off (and you’ll know by the smell, trust me), it won’t ruin your entire batter.
- You’ll feel like a very put-together person who actually knows what they’re doing in the kitchen.
Bonus tip:
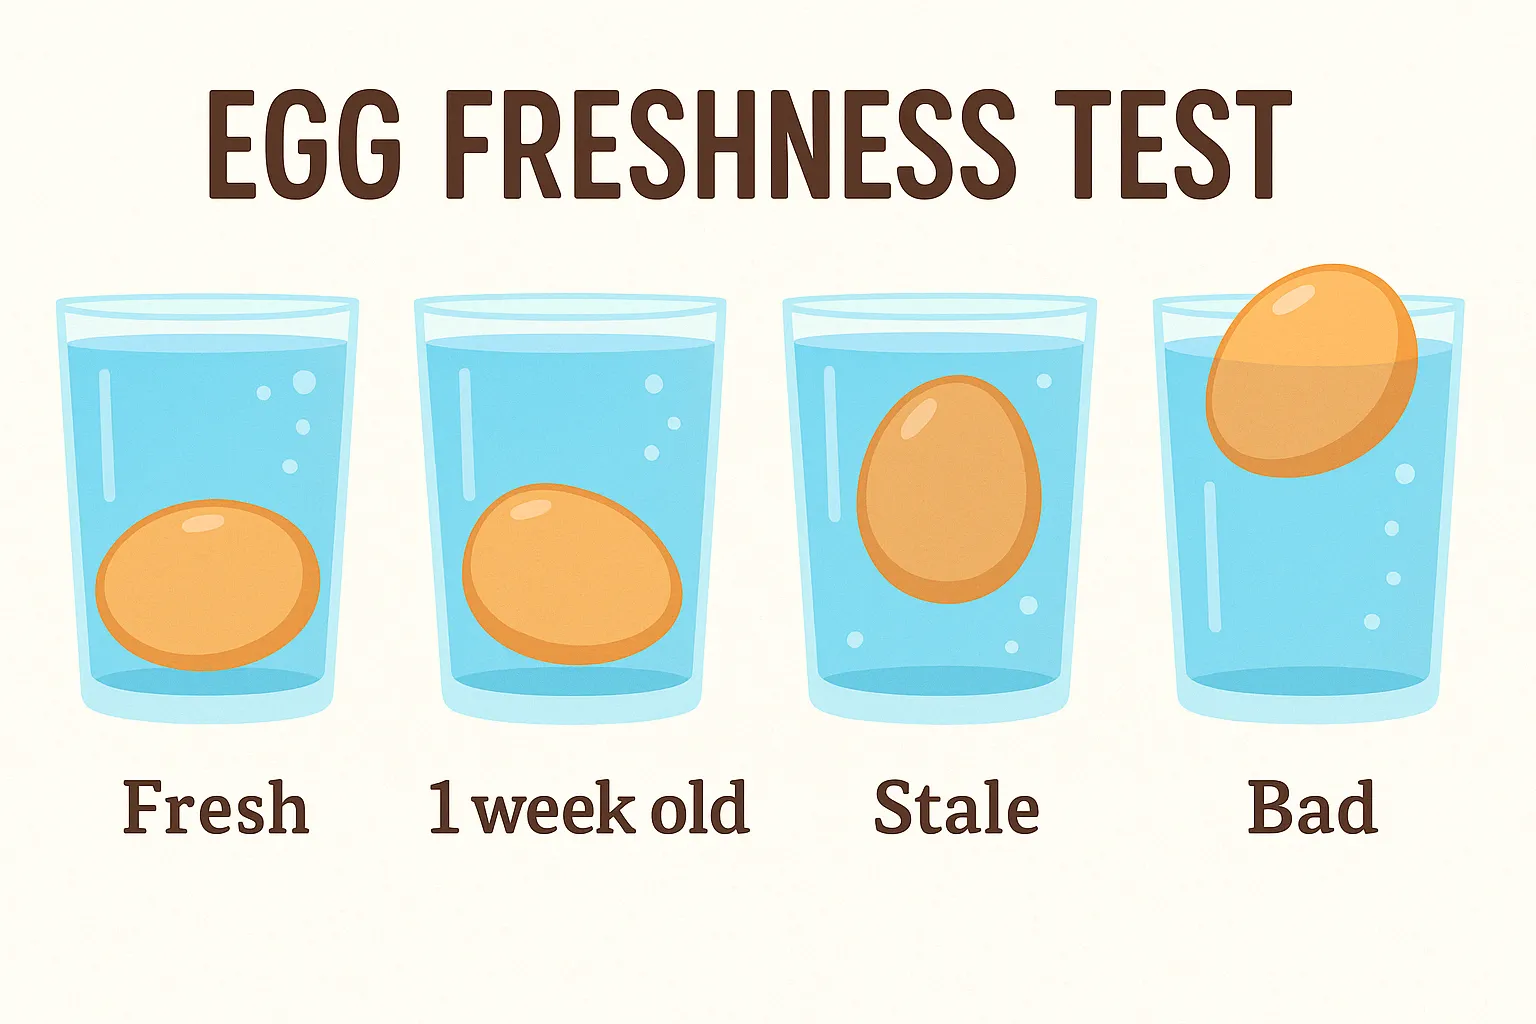
You can test your eggs for freshness by placing them in a glass of water. If the egg sinks it’s fresh and if it floats to the top you need to throw it out!
Tip 10. Stick to Real Butter, Sugar, and Flour (At Least the First Time)
So you’re trying to be a little healthier — totally understandable. But here’s the thing: when you’re new to baking, it’s best to play it safe and go with the classic trio of real butter, white sugar, and all-purpose flour.
Why?
Because those are the ingredients the recipe was almost always tested with. Swapping in almond flour, stevia, Greek yogurt, or mashed bananas might sound like a good idea, but it changes the whole structure of the bake — and often ends in disappointment. Or weirdly gummy muffins. Or sad, dry cookies.
Here’s the plan:
- Make the recipe exactly as written the first time.
- Take notes on the texture and flavor.
- If you want to tweak it next time (less sugar, healthier fats, gluten-free), you’ll know what you’re aiming for.
The golden rule:
Treats are meant to be treats. You can always enjoy them in moderation — or tweak the recipe after you’ve seen what it’s supposed to do.
Tip 11. Preheat Your Oven All the Way (Yes, All the Way)
We’ve all done it: the dough is ready, the kids are getting hangry, and you think, “Eh, the oven’s probably hot enough.” So in go the cookies at 285°F-ish while the preheat light is still on.
But here’s the deal:
Baking is all about temperature — that exact oven heat activates your leavening agents (like baking powder and baking soda) at the right time. If the oven’s not hot enough when your bake goes in, it might rise too slowly, spread too much, or bake unevenly.
Translation?
Flat cookies, sad muffins, and cakes that go “meh” in the middle.
What to do instead:
- Wait for the preheat beep (and trust your oven thermometer — more on that in Tip #12).
- If you’re baking something delicate or fancy, wait an extra 5 minutes after the oven says it’s ready. Many ovens say they’re preheated before the heat is fully stable.
Patience isn’t always easy, but trust me — your baked goods will reward you.
Tip 12. Get an Oven Thermometer (Because Your Oven Is Lying to You)
Your oven may say it’s at 350°F… but what if it’s secretly at 385? Or 325? Or hotter on one side than the other? Welcome to the wild world of oven temperature shenanigans.
Here’s the truth:
Most home ovens aren’t perfectly calibrated. They can run hot, run cool, or fluctuate all over the place — and when baking, those small changes can mean burnt bottoms, raw centers, or lopsided layers.
The fix:
Grab a cheap little oven thermometer (you can usually find one for under $10). Pop it in the center of your oven rack, and see what’s really going on. If it’s off, adjust your oven temperature up or down as needed — and you’ll be baking with way more confidence.
Bonus tip:
If your oven has hot spots (where one side cooks faster), rotate your tray halfway through baking — unless you’re baking something delicate like a cake that needs to rise undisturbed. (More on that in Tip #22!)
So yes, that tiny gadget? Total baking game-changer.
Tip 13. Use the Middle Rack (It’s Prime Real Estate for Baking)
Baking is not the time to get creative with oven rack placement. You might think, “Well, the bottom rack’s closer to the heat, so it’ll bake faster, right?” And… yes. But also wrong. So wrong.
Here’s why the middle rack wins:
- It gives you the most even heat circulation — not too hot from the bottom, not too dry from the top.
- It prevents burnt bottoms (cookie tray tragedy) and pale tops (a muffin’s worst nightmare).
- Most recipes are tested on the center rack — so that’s where they’ll behave best.
Unless the recipe says otherwise:
Always default to the middle. That’s where the magic happens.
Need to bake two trays?
Use the upper and lower third racks, and rotate them halfway through baking — both top to bottom and front to back for best results.
Because when it comes to baking, placement isn’t just about space — it’s strategy.
Tip 14. Don’t Open the Oven Door (Until You Really, Really Have To)
We get it. You just want to peek. Maybe those cookies look almost done… maybe that cake is finally rising… and that oven light? It’s right there.
But here’s the truth: every time you open the oven door, you let out a big burst of heat — and that drop in temperature can mess with your bake. Especially if what’s inside is delicate and needs to rise (hello, cakes and soufflés).
Why it matters:
- Even a 25°F drop can make your cake sink.
- Cookies may end up baking unevenly.
- That bread you’re super proud of might lose its lift.
The golden rule:
Keep the oven closed until the minimum baking time is up. Trust the process. Set a timer. Use the oven light if you must (it’s there for a reason). Only open the door when you’re reasonably sure it’s time to check doneness.
Repeat after me:
If you open, you risk a flop. If you wait, you get fluff.
Tip 15. Start With the Minimum Bake Time (You Can Always Add, But You Can’t Un-Bake)
When a recipe says “Bake for 12–15 minutes,” your best bet? Set that timer for 12 and start watching. Because once your cookies or cake are overbaked, there’s no turning back. You can’t sprinkle on moisture. You can’t wish away the dryness. What you can do is err on the side of caution.
Why it’s smart:
- Ovens vary (as we learned in Tip #12).
- Different pans affect bake times (looking at you, dark metal sheet pan).
- Your cookies will continue to bake a little even after they come out of the oven.
Here’s the plan:
Set your timer for the shortest time listed in the recipe. Check for doneness (a little golden on the edges, soft centers, bounce-back cake tops — depending on what you’re baking). If it needs more time, add 1–2 minute increments from there.
Bonus mom trick:
Cookies that look slightly underdone in the center? Pull them out anyway. They’ll finish cooking on the tray — and turn out perfectly soft and chewy. ✨
Tip 16. Scrape the Bowl (More Than Once, Please)
Mixing your batter and thinking, “That’s probably good enough…”? Hold that spatula.
Even if your mixer seems like it’s doing a great job, ingredients love to hide out at the bottom and along the sides of the bowl — especially butter, sugar, and flour. If you don’t scrape as you go, you might end up with weird little clumps or streaks of unmixed ingredients in your batter.
What to do:
- Scrape your bowl after creaming butter and sugar (this one’s big).
- Scrape again after adding your dry ingredients.
- Give it one final mix to bring everything together.
Use a good silicone spatula — flexible enough to sweep all the way to the bottom, but strong enough to fight the sticky stuff.
Why it matters:
Even mixing = even baking. No random pockets of flour. No sugary chunks. Just smooth, beautiful batter and cookies that bake up like they came from a bakery.
So yes, scraping is a little boring… but the results? Totally worth it.
Tip 17. Use the Right Tools (They Don’t Have to Be Fancy, Just Functional)
You don’t need a designer stand mixer or gold-plated measuring cups to be a great baker — but having a few reliable tools makes everything easier, faster, and way less frustrating.
The basics you’ll actually use:
- A set of dry and liquid measuring cups
- Measuring spoons (bonus if they’re magnetic and don’t get lost in the drawer)
- A sturdy silicone spatula (bonus points if it’s one solid piece — no gunk-trapping crevices)
- Two baking sheets that don’t warp in the oven
- Cooling racks
- A hand mixer (or stand mixer if you’re feeling fancy)
Why it matters:
Measuring properly, mixing evenly, and knowing your bakeware won’t bend like a pool noodle halfway through baking? That’s the kind of peace beginner bakers deserve.
Pro tip:
Start with the basics, and upgrade slowly as you bake more. Your tools don’t have to be expensive — just trustworthy.
Tip 18. Cool Completely Before Frosting (Unless You Like Frosting Slides)
You just pulled a beautiful cake or tray of cupcakes out of the oven and you cannot wait to frost them. You’re thinking, “It’s only a little warm, right?” Famous last words.
Here’s what happens if you rush it:
That lovely swirl of frosting you’re dreaming about will melt, slip, and slide right off your cake — turning your masterpiece into a sticky, sweet avalanche.
What to do instead:
- Let your bakes cool in the pan for a few minutes, then transfer to a cooling rack (or a piece of parchment on the counter if you’re out of racks).
- Wait until your cake, cupcakes, or cookies are cool to the touch — not just “kind of warm,” but actually cool.
- Only then is it time for the buttercream magic.
Bonus:
If you’re in a rush, pop your cake layers or cupcakes in the fridge (uncovered) for 15–30 minutes. Just don’t forget them in there!
Frosting that stays put = happier bakers and prettier bakes. (And fewer sticky disasters.)
Tip 19. Let Cookies Cool on the Tray for a Few Minutes
You know that moment when your cookies come out of the oven looking amazing… and then you try to move one right away and it falls apart like a sad little sugar landslide?
Yeah, that’s because they’re not ready to be touched yet. Cookies are like toddlers — they need a minute.
Here’s the sweet spot:
Once your cookies are baked, let them sit on the tray for 5–10 minutes before transferring them to a cooling rack (or the counter with some parchment paper, no judgment here). This lets them:
- Finish baking on the hot tray
- Firm up just enough to hold together
- Develop those delicious crispy edges and soft, chewy centers
Skip this step and…
You risk broken cookies, smeared chocolate chips, and unnecessary heartbreak.
So go ahead — give your cookies their cool-down time. They’ll thank you by holding it together (literally) and tasting amazing.
Tip 20. Practice Makes Better (Nobody Starts as Mary Berry)
Listen, nobody bakes the perfect cake on their first try. Or their second. Or sometimes their sixth if toddlers are involved. And that’s totally okay. Baking is a skill — like riding a bike or folding a fitted sheet (still working on that one) — and it gets easier every time you do it.
Here’s what to remember:
- Your first bake might be a little wonky. That doesn’t mean you’re bad at it.
- Every mistake is a lesson in disguise (usually one covered in powdered sugar).
- The more you bake, the more confident you’ll get — and the more fun you’ll have.
So what if…
Your muffins sank in the middle? Still delicious.
Your cookies spread into one giant cookie blob? Slice it like bars and pretend it was the plan all along.
You forgot the baking powder? You now have a lovely flatbread situation.
Bottom line:
Perfection is overrated. Enjoy the process, laugh at the flops, and celebrate the wins — because every bake gets you one step closer to feeling like the confident kitchen queen you were clearly born to be. 👑
There you go — 20 beginner baking tips to help you skip the stress, dodge the common pitfalls, and actually enjoy the process (yes, even the messy parts). Whether you’re baking for your family, the school fundraiser, or just because your kitchen smells amazing when there’s something in the oven, these little tips will help you feel more confident every time you tie on that apron.
Remember: you don’t need fancy tools, a Pinterest-perfect kitchen, or years of experience to bake something wonderful. You just need a little know-how, a sprinkle of patience, and maybe a cookie or two along the way. 🍪💛
Now go preheat that oven, take a deep breath, and bake something delicious — you’ve totally got this.
Leave a Reply